
2018 Note: Obsolete! This chip has been superseded by the TAPLFO 3
The new chip adds several features, has additional waveforms and improved resolution, and also no longer requires a crystal. It’s an improvement in pretty much every way! Head over and check out the data sheet.
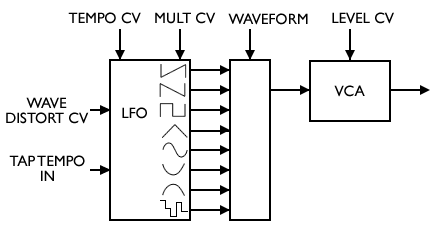
This simple Tap Tempo LFO is based on the PIC 16F684. You can set the LFO frequency by tapping a tempo on a button connected to the chip, or by changing the Tempo CV. With this chip you can build tap tempo effects units or stompboxes, tap tempo controlled drum machines or tap tempo sequencer clocks. All of these are described in the datasheet below.
The LFO can produce 8 waveforms, including a random (sample & hold) wave. All the waveforms except the random wave can be altered by the wave distortion CV. See the VCLFO page for more details of waveform distortion.

The chip also includes a tempo multiplier. This is combined with the tapped tempo to allow the LFO frequency to be set at a multiple of the tapped rate. The available multipliers are 0.5, 1, 1.5, 2, 3, and 4. This allows half- and double-time, and triplet times.
The LFO tempo, multiplier, waveform selection, wave distortion, and output level are all voltage-controlled using 0-5V. Unwanted features are easily disabled by tying the relevant pin to a constant voltage (usually 0V or +5V).
Block Diagram
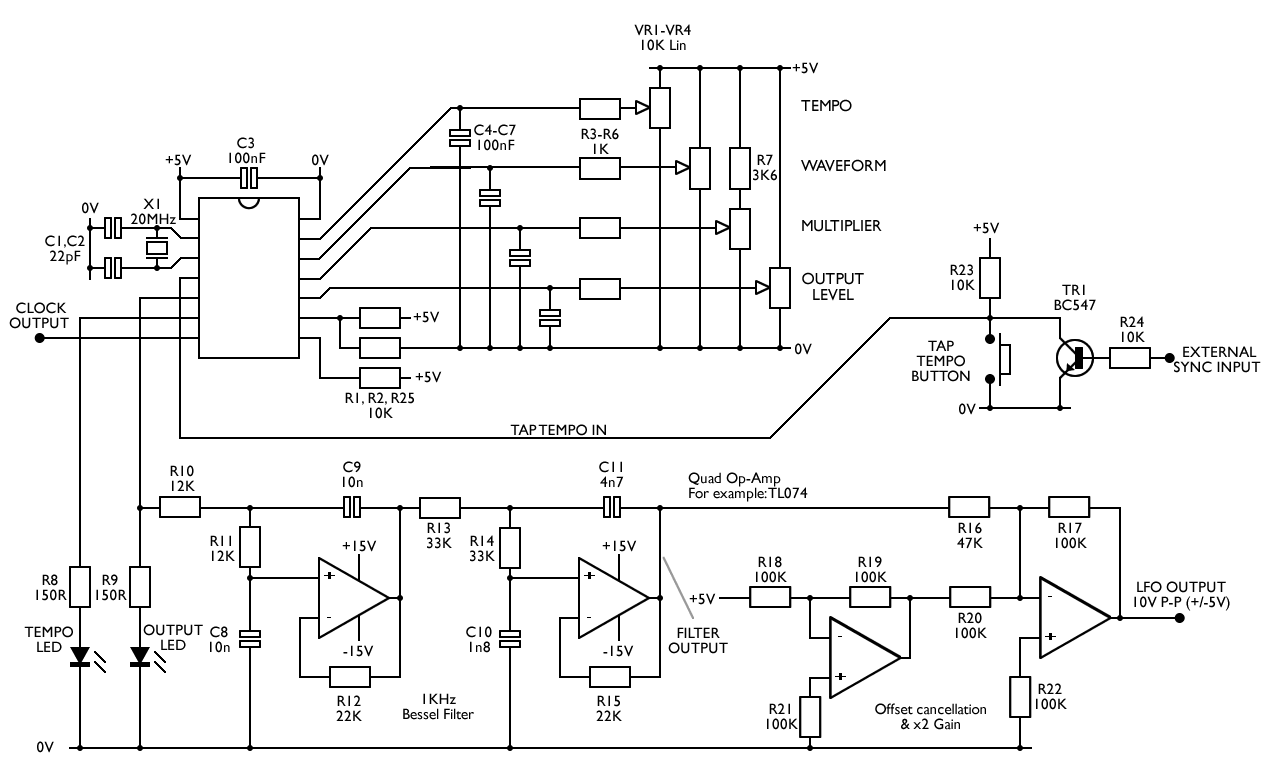
The chip uses the analogue inputs of the PIC for CVs. These are fed to the internal A/D convertor, which samples each input every 150uS or so and converts the voltage to an 8-bit value. In order to avoid using an external D/A convertor for the output, the chip uses the built-in PWM module. The PWM output needs passing through a lowpass filter to convert the pulses back into an analogue output.
Using an external crystal with the PIC allows the chip to run at its maximum clock speed of 20MHz, and this means that the PWM module is able to produce a 19.5KHz sample rate at 10-bit accuracy. Although this doesn’t sound like much, in practice it is impossible to hear any artifacts in most situations.
Pinout Diagram

Possible uses
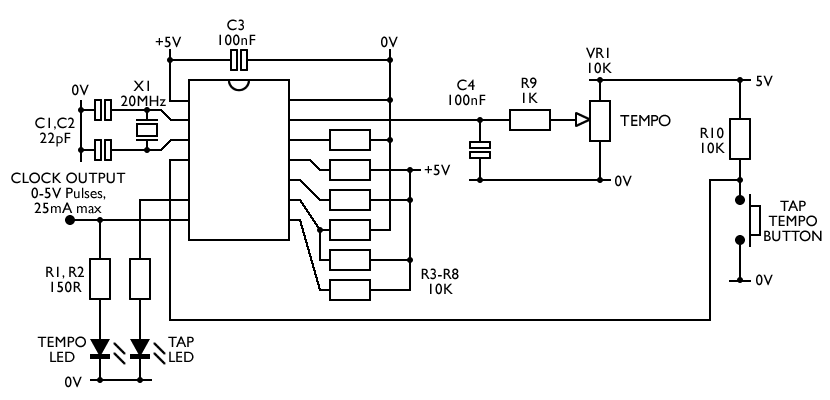
The TAP TEMPO input can accept clock pulses from other equipment, which allows the LFO to be syncronised to other devices. The chip also includes a CLOCK OUTPUT which can be used to drive other equipment. This allows a tap-tempo controlled clock for an analogue sequencer or drum machine, for example.
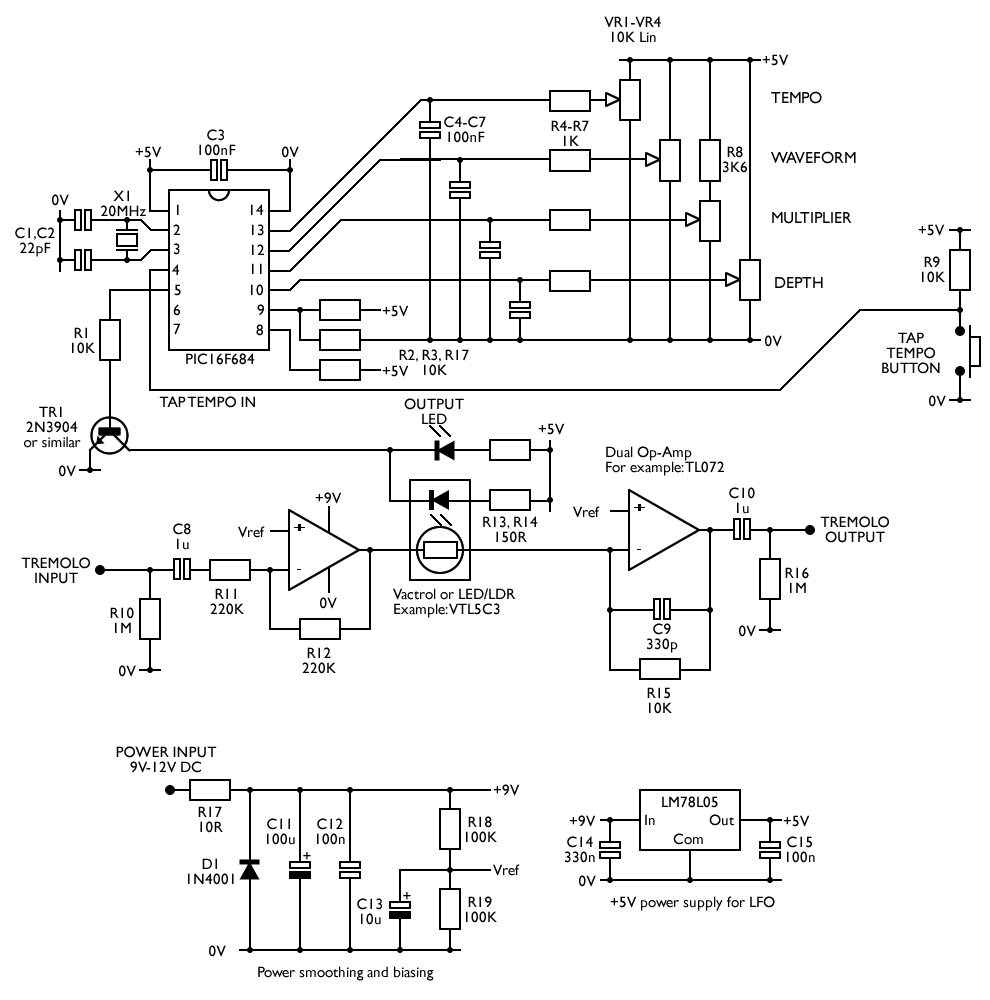
The PWM output from the chip can be used to drive the LED in a vactrol (or similar LED/LDR combination) directly, without any subsequent op-amp filter stages. The slow response of the vactrol provides more than enough filtering. This makes for an extremely simple circuit with very few components. The vactrol’s LDR can be used to replace a standard potentiometer to add tap tempo LFO control to a variety of circuits.
Example circuits are in the datasheet.
More details
If you’d like to build one, or like to know how I built mine, perhaps you’d like to look at:
- Tap Tempo LFO PIC 16F684 ASM code
- Assembled HEX code from above file
- Circuit Diagram – complete modular synth tap tempo LFO
- Circuit Diagram – tap tempo tremolo
- Circuit Diagram – tap tempo sequencer clock
- Tap Tempo LFO datasheet (includes example circuit diagrams, example waveforms, and chip pinout)
The Tap Tempo LFO elsewhere on the web
There’s a tap tempo tremolo project using my chip over at MusicPCB.com. You can get a PCB and a programmed chip for $19. Alternatively, you can get just the chip over at Small Bear Electronics.
There has also been a lot of discussion about this project over at DIYStompboxes.com where I initially put the idea forward. I got a lot of support, and no-one got annoyed at me for taking about nine months to finish it off! Thanks guys!
Rick Holt of Frequency Central has developed a DIY PCB for this project over at Muffwiggler.com.
Version 2
Chris Safi added the Wave Distortion feature from my original VCLFO into the TAPLFO code. I added a phase reset on the first tap to the tap tempo input. This allows you to keep the LFO on the beat with a single tap. I also tweaked some waveforms so they all reset to the top of the waveform. Finally, I used the spare pin from the first version as a digital input to step through the different multipliers. This works with the Multiplier CV in the same “either/or” way as the Tap Tempo input and the Tempo CV.
Version 2D – a bug fix
It turns out that as a result of adding the Wave Distortion feature in version 2, it became possible for the Clock output on pin7 to drift slowly out of sync with the main LFO output. This is due to inaccuracies in the calculations building up. This is much worse at slow settings (when the increments are small, so errors are proportionally larger), and when using extreme wave distortion settings (when the errors generated are greatest). It also doesn’t happen if the unit is sync’d to external pulses, since the phase is reset every time the pulses are timed.
Anyway, you’re not interested in that, right? You just want to know I’ve fixed it, right? Right! Version 2D is the fixed version.
Hi,
I have a question about the sync in/tap input on this PIC. What is the top frequency that can be input for sync’ing the chip’s program to a speed? I am thinking of using this PIC to output higher frequencies in the audio range (below 880hz)
thanks
Hi Robert,
I’m not sure exactly how fast it will go. I doubt it’ll get as high as 880Hz though. It was *designed* to behave nicely up to 50Hz or so, and it does. Beyond that, I didn’t test it much. What happens is that as the frequency climbs, the errors become more significant, so there’s no “hard limit”, just a gradual roll-off in performance.
This is for two reasons:
The frequency increment is calculated by a division, like 1000/x, where x is the timing period. As X gets small, the steps between adjacent frequencies become larger, so the frequency resolution gets worse as the tap tempo period gets shorter.
The second reason is that the timing is done at the 19.5KHz sample rate, so the timing resolution is almost 1/20th msec. This is very accurate below 100Hz, but by the time you’re at 1000Hz, it makes 48Hz difference – roughly 5%.
You’ll also hit problems with the wave distort feature, since the calculations there assume a fairly low frequency and they don’t have sufficient accuracy to go very high. That might be the limiting factor in the end.
If you give it a try, let me know!
Hi I just ordered a couple of these chips to play with, is there a way to have the tremolo pan between two channels?
You could repeat the vactrol+second op-amp part of the Tremolo circuit, and then drive the vactrol’s LED from an anti-phase version of the Pin 5 PWM output. It might be possible to just use the single drive transistor and have one LED from Ground to Collector, and the other from collector to +5V, but I can’t say for sure without trying it.
HTH,
Tom
Hi Tom. I’m breadboarding with the TapLFO right now using some of the example circuits and I have two questions:
1. I’m having trouble determining how to use both the Tap Input (with a momentary footswitch) and Tempo VR1 in the same circuit. It seems the Tap input doesn’t work with the Tempo VR connected. I figured once there is a change from one of the inputs, it overrides the other? What is the correct behavior/schematic?
2. Does the Tempo LED indicate the current Tempo only when using the Tap input? It doesn’t seem to output Tempo set by the Tempo VR1.
Thanks.
Your questions tell me that you’ve got a fault somewhere on your breadboard! If it’s working correctly, you should be able to use both the Tempo pot and the footswitch at the same time. The firmware simply uses whichever you altered last – like you said, if there’s a change from one, it overrides the other. The Tempo LED should follow that latest tempo, whatever it was.
Have you got a 10K pull-up resistor on your footswitch? Is the pot properly connected between 0V and 5V? Does everything else work ok? (If not, maybe the chip’s not happy at all – bad clock? Bad chip?). Drop me a line and we’ll get you debugged.
I would really appreciate an answer to this question about using the chip for a basic drum machine, virtually a tap-tempo metronome.
Does the output pulse start immediately with no noticeable lag? That is, is the output pulse an immediate continuation of the input pulse when the latter stops?
Thanks if you have the time to answer.
Hi John,
The chip times the space between two falling edges on the Tap Tempo input. That is, the input is inverted logic, or expects a short-to-ground. If you’ve got positive-going pulses to sync to, a transistor in front of the input is enough. There’s an example in the datasheet circuits.
As soon as the chip has the new tempo, it resets itself and starts off at the new tempo.
I guess this means that if you were trying to sync it to a drum machine, you’d need one extra beat as a lead-in. So “1..1,2,3,4, etc)
If you were using it to build a drum machine, you’d be able to tap a tempo to set the rate, but you can’t stop it. Even if you haven’t tapped anything, it’ll be running at some rate (the one set by the pot). As soon as it receives two taps, it’ll jump to the new tempo.
Does that make it clearer? If you’ve got further questions Drop me a line and we’ll see what we can get sorted.
Tom
Hi
l am trying to make a eurorack module out of your modular lfo-circuit diagram, but l have a few questions:
How should l pull 15 volts from a eurorack to the two op amps?
How does the circuit react to for example a 12 volt external sync input?
Sorry if the answers are obvious, l am new to building circuits.
You can run the circuit off the usual Eurorack supply of +/-12V instead of +/-15V. It won’t matter. The only bit that is sensitive is the TAPLFO chip, and it has its own +5V supply anyway.

The External Sync input will cope with inputs up to about 20V iirc. Since I designed this circuit, I’ve made one modification: I recommend adding a diode. This protects the transistor if the external sync is fed with a negative-going voltage (an LFO, say). It looks like this, except this example has the TR1 and R2 the other way around. It’s from the VCLFO, not the TAPLFO, so the transistor pulls the pin high instead of low – but it’s the same thing.
Drop me an email if you get stuck or have any other queries.
HTH,
Tom
Hi – I’m working on a project for my pedalboard. Will this circuit accept tap from a boss style momentary pedal, pass it through to an output, and also display the bpm speed on a small LCD?
If the Boss pedal does a short-to-ground action then it could easily be connected, since that’s what the tap tempo button does.
Displaying the BPM on an LCD would require some extra circuit, but I imagine such a project (Tap to LCD) exists somewhere. I think I remember doing it for a delay over on DIYStompboxes.com
Can the clock output at pin 7 be taken naked into the outside world (in a modular synth), or should it be buffered?
The pin can sink/source up to 25mA, so they’re pretty robust, but they do need some protection. You have to judge whether you think it’s worth adding extra buffers or whether you just replace a PIC worth a few pounds if you blow one up.
A worse case scenario might be -15V being connected to the output while it’s high. That puts 20V across the output. A 1K resistor in series with the output would limit that to a survivable current for the PIC. That would be the most basic minimum protection that you should definitely include.
Have a few 10-turn pots available. Would these make sense for any of the positions, or just be overkill ?
Don’t know with which resolution the PIC senses the pot wipers ?
Last question: pot value not critical, right ? Saw 10kOhm stated, but I figure it’s just the wiper-voltage, not its impedance, right ?
(those 10-turn pots are 5 kOhm)
Thanks!
5K Pots will be fine. I’ve used values from 10K to 100K with no problems.
10 turn pots are going to cover 3600 degrees total – thats 3600/256 = 14 degrees per step of resolution. I guess that’s not a total waste!
Thanks Tom, good to hear.
Looks then like spending 10-turn pots on ‘Tempo’ and possibly also ‘Wave Distort’ makes sense.
Thanks!
Sorry for not having read the docs in full, answers part of my question already…
(“8-bit resolution on the control voltages. Whether a standard potentiometer actually has the accuracy to directly produce an 8 bit resolution is another question.”)
Hmm, that sounds like a nice justification to waste a 10-turn pot on! 😉
Best regards
What kind of Overvoltage protection is necessary for the CV inputs (ie speed). I want to use external voltage control for the chip. Also, What about negative voltages?
The recommended way is Schottky diodes from the rails to the pin. Have a look at the example schematic in the VCDO datasheet, which includes CV inputs:
https://electricdruid.net/datasheets/VCDO1Datasheet.pdf
To be honest, when we built the Frequency Central Waverider module, we didn’t include the diodes, and we didn’t have any problems (they don’t blow up). The 4K7 resistor limits current into the pin to a level the chip can handle, and it has internal protection diodes anyway, which are apparently sufficient. External diodes is a “belt and braces” approach.
To prevent negative voltages, you can add a couple of diodes to your CV input mixer to turn it into a halfwave precision rectifier, like this:
http://www.ecircuitcenter.com/Circuits/op_HW_recitifier/Op_HW_Rectifier.htm
HTH,
Tom
Thanks
Is there a way to disable some divisions? eg. just have 1, 1,5 2 and 3? do i have to look at ‘tempomultiplication’ lines?
The easiest way is to alter the MultiplierTable at the bottom of the code (it’s the first of the lookup tables).
If you only want 4 options, you could repeat each one twice. Otherwise, use only the bottom four settings, and then add a 10K resistor above the 10K multiplier pot to limit its range.
HTH,
Tom
Hey Tom, Im using the “next multiplier” how can I make it to start the lfo at x1 speed at each startup? it powers up at x1.5
Hi Mariano,
Until you press the “next multiplier” button, the chip will use the setting given by the Multiplier CV. So if you want it to start on x1, set the appropriate voltage on that pin. Remember that the “next multiplier” button does exactly what it says – moves to the next multiplier in the series. If you start up on x1, the first press of next multiplier will give you x1.5.]
HTH, Tom
Hi Tom,
Do you know if someone built a musicpcb tap tempo tremolo with the TASFLO 3C?
Would you have a link?
Thanks!
Paulo
I don’t have a link, but I’ve exchanged emails with people who have done it. The TAPLFO 3C datasheet details the changes required, but basically you leave a few bits out: The crystal and the two 22pF caps, and the 10K pull-up resistors on the switch inputs. You can then add links or switches in the position of the two 22pF caps to access the new features. The “Tempo LED” output on the 2D becomes an input on the new chip to turn on the the waveform smoothing feature to reduce clicks in the Tremolo. The rest is the same, IIRC.
I just found an old Electric Druid Tapflo 2D in my drawer. Anyone know any fun DIY builds I can do with it??
You could grab a MusicPCB Tap Tempo Tremolo PCB quick before Taylor gives up. Or if he already has, I think I might have a spare..;)